LF-07 · TEACHER LESSON PLAN
Density column
Measure equal liquid volumes, then test where dry objects settle
Driving question
Learning objectives
- Students measure the mass of equal 30 mL volumes and calculate each household liquid's density in g/mL.
- Students observe whether the selected liquid phases remain separate after a measured, careful pour.
- Students predict where each dry test object may settle, then compare its observed position with the measured column.
Standards
| Dimension | Alignment |
|---|---|
| Performance expectation | MS-PS1-1Develop models to describe the atomic composition of simple molecules and extended structures. (Partial alignment: this is the performance expectation the lab lists, but the activity investigates a physical property of matter (liquid and object density) rather than building atomic models.) |
| Practices | SEP 6Construct explanations. |
| Core idea | PS1.AEach pure substance has characteristic physical and chemical properties (for any bulk quantity under given conditions) that can be used to identify it. |
| Crosscutting | Cause and effectCause and effect relationships are routinely identified, tested, and used to explain change. |
NGSS performance expectation, core idea and crosscutting concept wording are based on the published NGSS text. The listed performance expectation has only a limited connection to this density investigation.
State standards crosswalk
Use the row as a planning crosswalk, then confirm local district pacing and grade placement. “Partial” labels describe a skill connection, not full mastery of the complete standard.
| State | Verified standard | How this lesson aligns | Official source |
|---|---|---|---|
| California | CA NGSS 5-PS1-3 | Limited connection only: students observe and record material properties, but this standard's assessment boundary explicitly excludes density as an identifying property. Do not count this activity as full alignment. | Open standard ↗ |
| Texas | Science.6.6(D) | Direct topic match: students measure equal liquid volumes, calculate density from net mass, and compare relative positions; the object column remains qualitative. | Open standard ↗ |
| Florida | SC.8.P.8.4 | Direct topic match: students compare measurable physical properties by calculating liquid density and observing objects in the column; the lesson does not cover every part of the standard. | Open standard ↗ |
| New York | NYSSLS 5-PS1-3 | Limited connection only: students observe and record properties, but the standard's assessment boundary explicitly excludes density. Treat density as an extension beyond this performance expectation. | Open standard ↗ |
| Pennsylvania | STEELS 3.2.6-8.A | Limited practice connection: students model a material property, while this expectation focuses on atomic-composition models. The column does not demonstrate the full expectation. | Open standard ↗ |
Materials and prep timeline
PER GROUP
- One clear plastic column (about 500 mL) and stable tray
- About 60 mL each of one syrup, dish soap, water and cooking oil
- Balance, 30 mL graduated measure, and one clean massing cup
- One drop of food coloring for the water
- One cork, grape, plastic bead and steel washer
- One spoon or pipette, labels and paper towels
- One observation sheet per student
TEACHER ONLY
- For 20, 25 or 30 students, stage 5, 7 or 8 complete group kits; print one student sheet per student.
- Place each plastic column on a tray and check product ingredients and allergies before setup.
- Demonstrate taring the cup or subtracting its empty mass; use 30 mL for every density reading.
- Show how to pour slowly, then record mixing or emulsification instead of promising four stable bands.
- Direct disposal of mixed liquids according to local guidance; do not pour oil down the drain.
CLASS-SIZE KIT PLANNER
One per-group kit contains every item in the team materials list above. Groups are balanced around the listed 3–4 students target.
| Students | Groups | Per-group kits | Student sheets | Suggested group split |
|---|---|---|---|---|
| 20 | 5 | 5 complete kits | 20 copies | 5 groups of 4 |
| 25 | 7 | 7 complete kits | 25 copies | 4 groups of 4 and 3 groups of 3 |
| 30 | 8 | 8 complete kits | 30 copies | 6 groups of 4 and 2 groups of 3 |
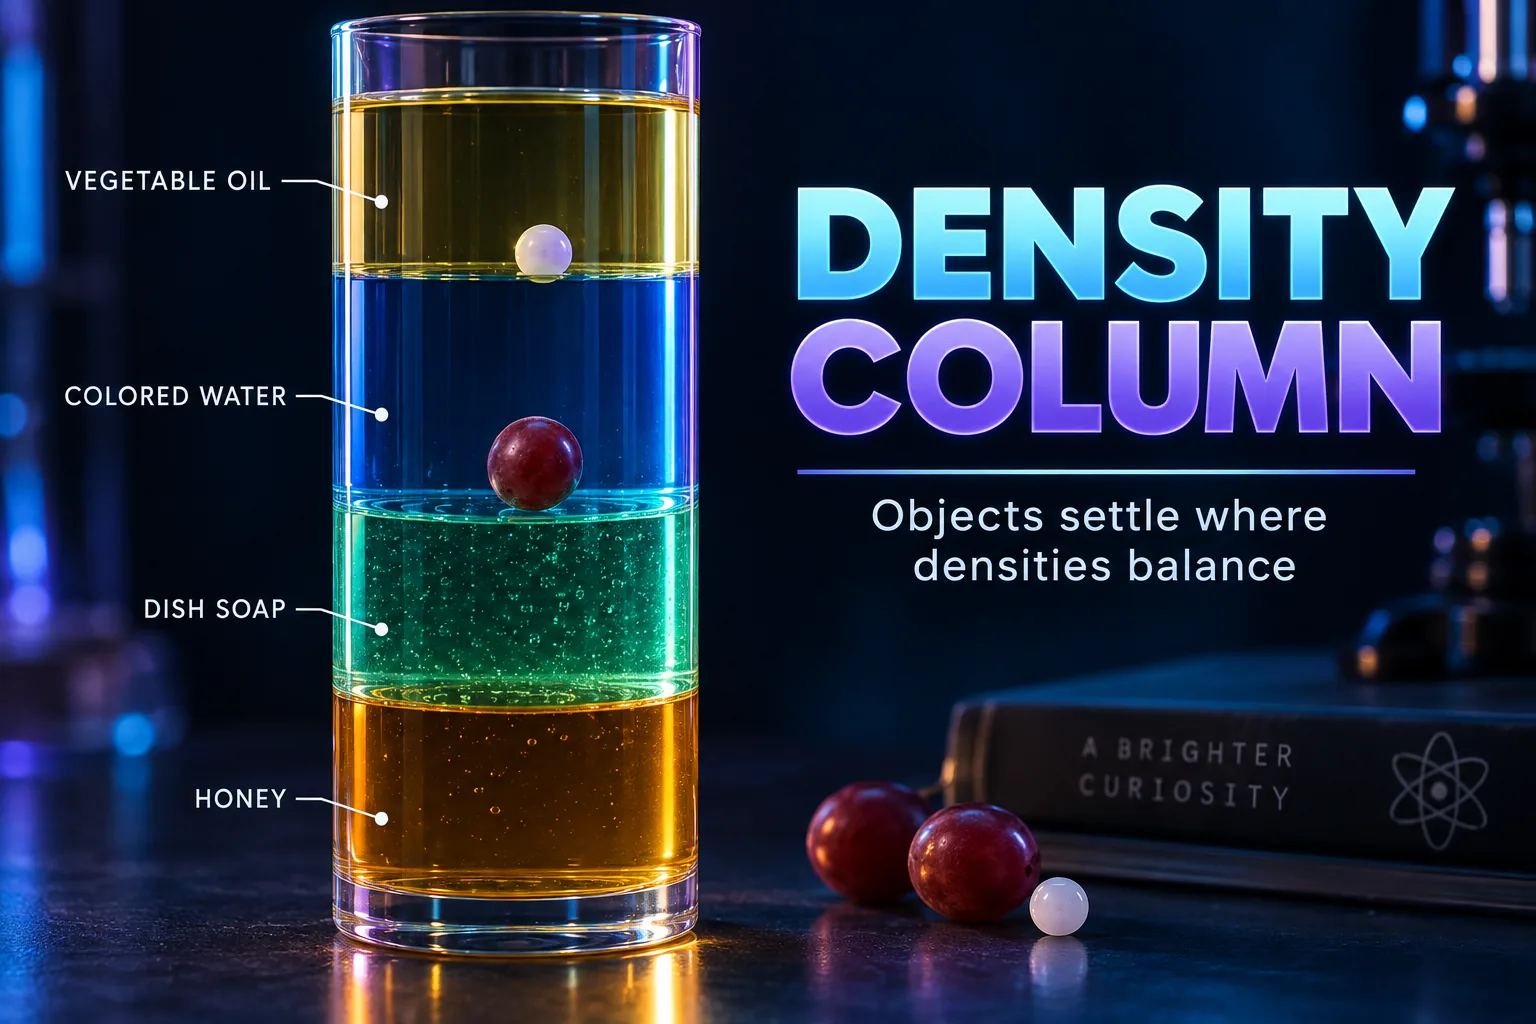
Predict the measured order of the liquids and where each dry object may settle; record predictions before testing.
Tare the same clean cup, measure 30 mL of each product, record net mass, and calculate density as g/mL.
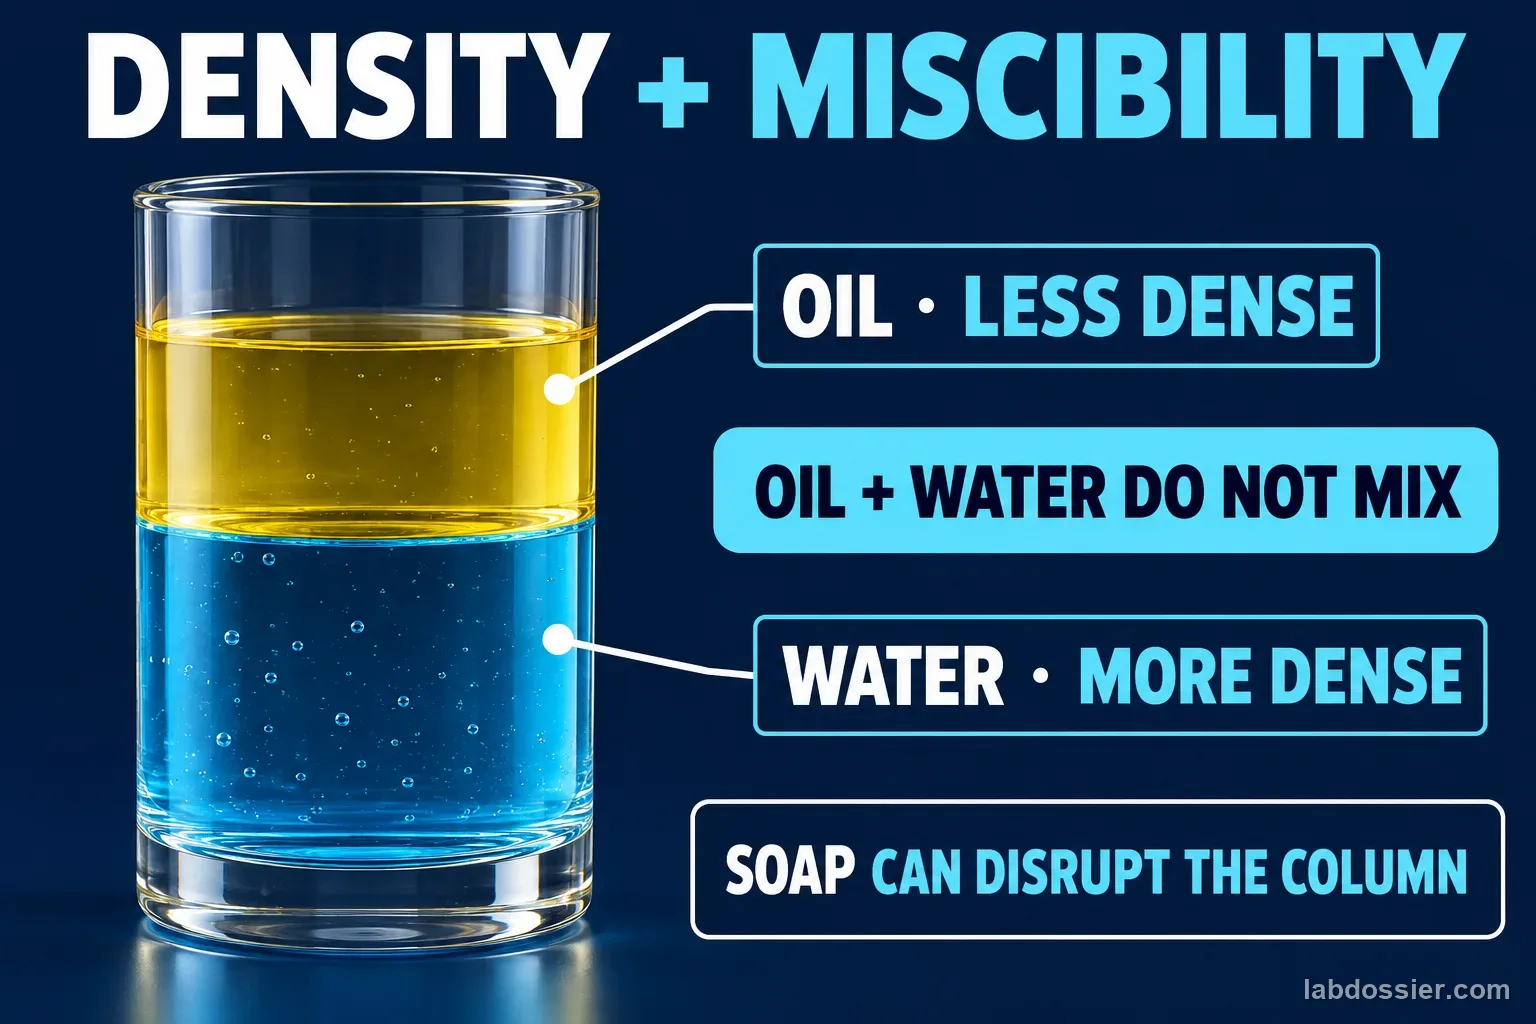
Pour from greatest measured density to least. Wait five minutes and record whether each phase stays separate, blurs or mixes.
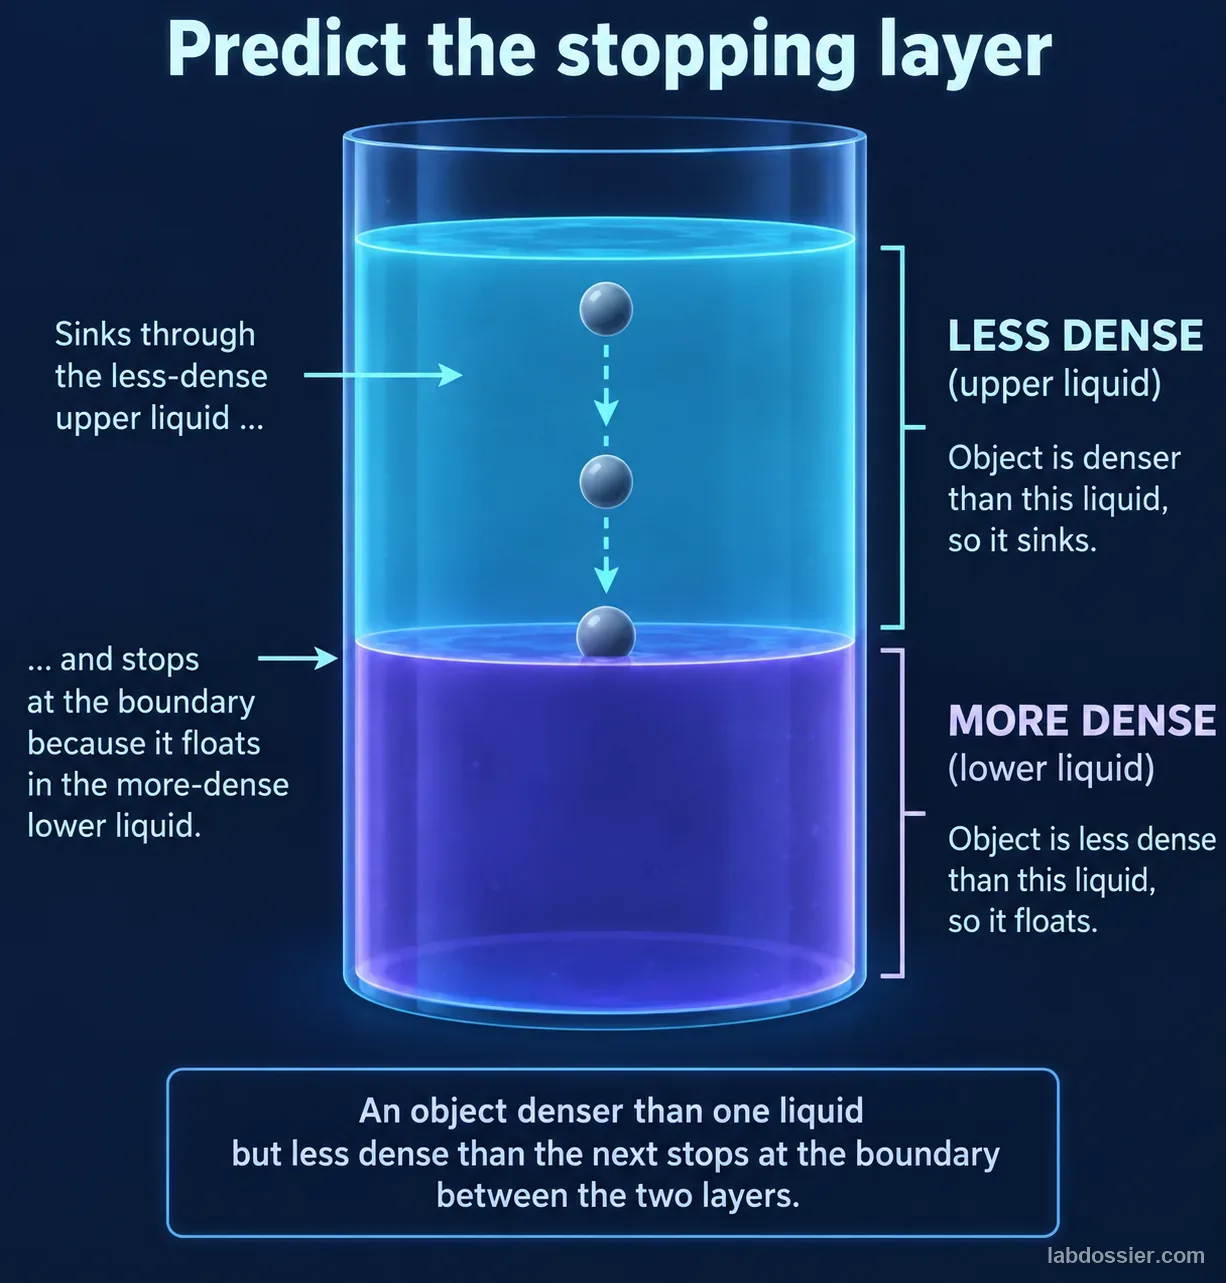
Lower each object gently; record its position after 30 seconds and note any bubbles or mixing.
Compare measured values with observed positions, discuss miscibility and model limits, then follow teacher disposal directions.
Lab figures and data visuals
Reviewed article images support the lesson flow. Use the tables and student sheet to record actual observations; pictured patterns are not target results.
Printable shopping list
Shopping and staging checklist
Multiply the per-group kit contents by the class-size planner. The teacher section includes teacher-provided materials and setup or safety notes.
PER-GROUP KITS
- One clear plastic column (about 500 mL) and stable tray
- About 60 mL each of one syrup, dish soap, water and cooking oil
- Balance, 30 mL graduated measure, and one clean massing cup
- One drop of food coloring for the water
- One cork, grape, plastic bead and steel washer
- One spoon or pipette, labels and paper towels
- One observation sheet per student
TEACHER-PROVIDED MATERIALS + SETUP RULES
- For 20, 25 or 30 students, stage 5, 7 or 8 complete group kits; print one student sheet per student.
- Place each plastic column on a tray and check product ingredients and allergies before setup.
- Demonstrate taring the cup or subtracting its empty mass; use 30 mL for every density reading.
- Show how to pour slowly, then record mixing or emulsification instead of promising four stable bands.
- Direct disposal of mixed liquids according to local guidance; do not pour oil down the drain.
QUANTITIES BY CLASS SIZE
| Material | Per group kit | 20 students | 25 students | 30 students |
|---|---|---|---|---|
| Clear plastic column on tray | 1 | 5 | 7 | 8 |
| Each liquid, syrup / soap / water / oil | 60 mL | 300 mL | 420 mL | 480 mL |
| Balance and 30 mL graduated measure | 1 each | 5 each | 7 each | 8 each |
| Food coloring | 1 drop | 5 drops | 7 drops | 8 drops |
| Cork, grape, plastic bead and steel washer | 1 of each | 5 of each | 7 of each | 8 of each |
| Spoon or pipette, tray and towel | 1 of each | 5 of each | 7 of each | 8 of each |
| Labels | 1 set | 5 sets | 7 sets | 8 sets |
| Observation sheets | 1 per student | 20 | 25 | 30 |
Prepare 5 kits for 20 · 7 kits for 25 · 8 kits for 30 students.
Lesson flow
| Minutes | What happens |
|---|---|
| 0–5 | Engage Ask how both density and mixing behavior may affect the column. Record density and object-position predictions. |
| 5–15 | Explore Measure equal 30 mL samples, record net mass and calculate each liquid's density. |
| 15–25 | Pour from greatest measured density to least, wait five minutes and record which phases stay separate or mix. |
| 25–37 | Explain Test the cork, grape, plastic bead and steel washer gently. Record each observed position after 30 seconds and compare it with the measured liquid values. |
| 37–50 | Evaluate Explain the result using density and miscibility; include one product or method limitation. Do not taste the column; dispose of oil as directed. |
Discussion questions
1. How can an object stop at a boundary?
2. Why record the actual liquid order rather than assume a fixed recipe?
3. Why dry each object before adding it?
4. Does this column give an exact density for each object?
Common misconceptions
Differentiation
SUPPORT
- Provide a four-color key and layer labels that students can place beside the clear cylinder.
- Model a top-to-bottom sketch before adding any objects.
- Offer the frame: “The ___ settled at ___, between ___ and ___; I predicted ___.”
EXTEND
- Measure equal liquid volumes on a balance and calculate mass per volume to estimate density order.
- Compare one object in each layer and use its resting boundary to bracket its average density.
- Repeat with a different brand of dish soap or oil and explain why the layer order may shift.
Assessment rubric
| Criterion | Beginning | Developing | Secure |
|---|---|---|---|
| Layer order | Does not record the liquid order. | Records some layers but omits top/bottom or boundaries. | Labels the observed settled layers from top to bottom. |
| Prediction and observation | Leaves object predictions or outcomes blank. | Records predictions and outcomes but does not compare them. | Records each object’s predicted and actual resting layer and marks the match accurately. |
| Density explanation | Explains only by object weight or size. | Names density without comparing the surrounding layers. | Uses relative density of object and adjacent liquids to explain the resting position. |
| Model limits and care | Treats the layer order as exact for every product or tastes a sample. | Names one setup limit or safety rule. | Recognizes product/mixing variation and handles the non-food mixed column safely. |
Vocabulary
- Density – Mass divided by volume; a measure of how much matter occupies a given space.
- Layer – A distinct region of liquid in the settled column.
- Boundary – The surface between two neighboring liquid layers.
- Average density – The mass of an entire object divided by its total volume, including enclosed air.
- Displace – To move liquid out of the way when an object enters it.
- Prediction – A testable statement about what may happen before collecting the result.
Safety, cleanup and troubleshooting
BEFORE STUDENTS TOUCH ANYTHING
- Even if the starting liquids are kitchen products, the mixed column is a lab sample: do not drink or taste it. Check ingredients for allergies before setup.
- Use a stable, unchipped container on a tray. Wipe spills promptly; syrup and oil can make floors slippery.
- Lower dry objects gently and keep the cylinder away from the table edge. Follow teacher directions for disposal; do not pour oil down the sink.
Troubleshooting: If boundaries look blurred, stop adding liquids, keep the cylinder still and wait for settling. If an object carries surface water or trapped air, remove it, dry it and retest only if the column remains clear. Clean oil or syrup spills promptly and do not taste any mixture.